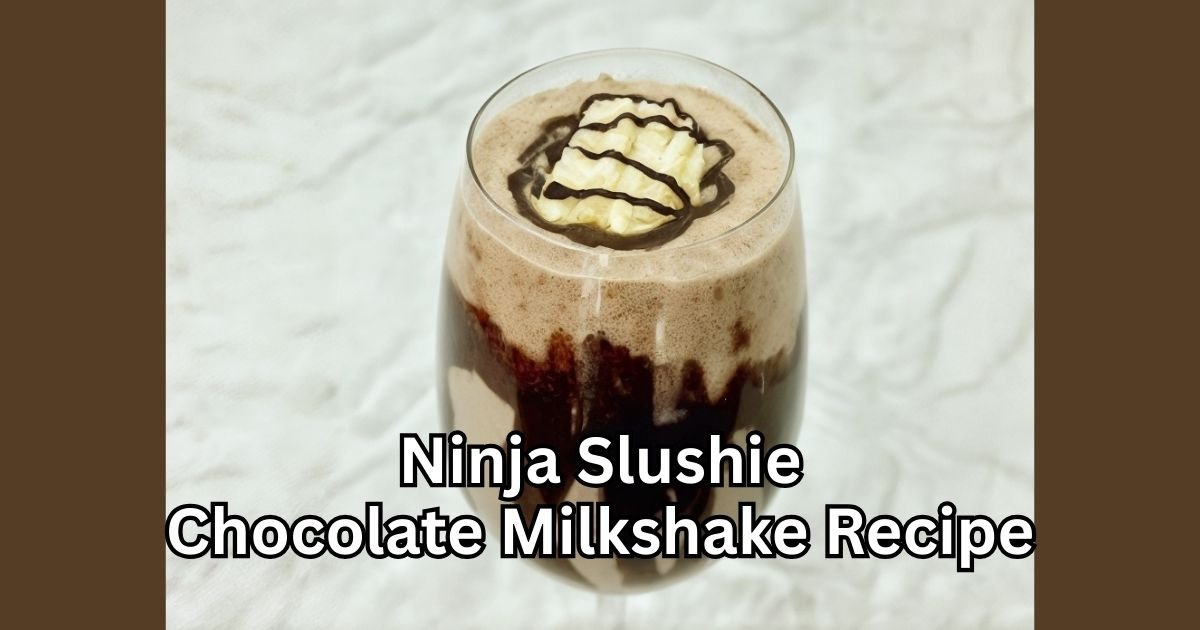
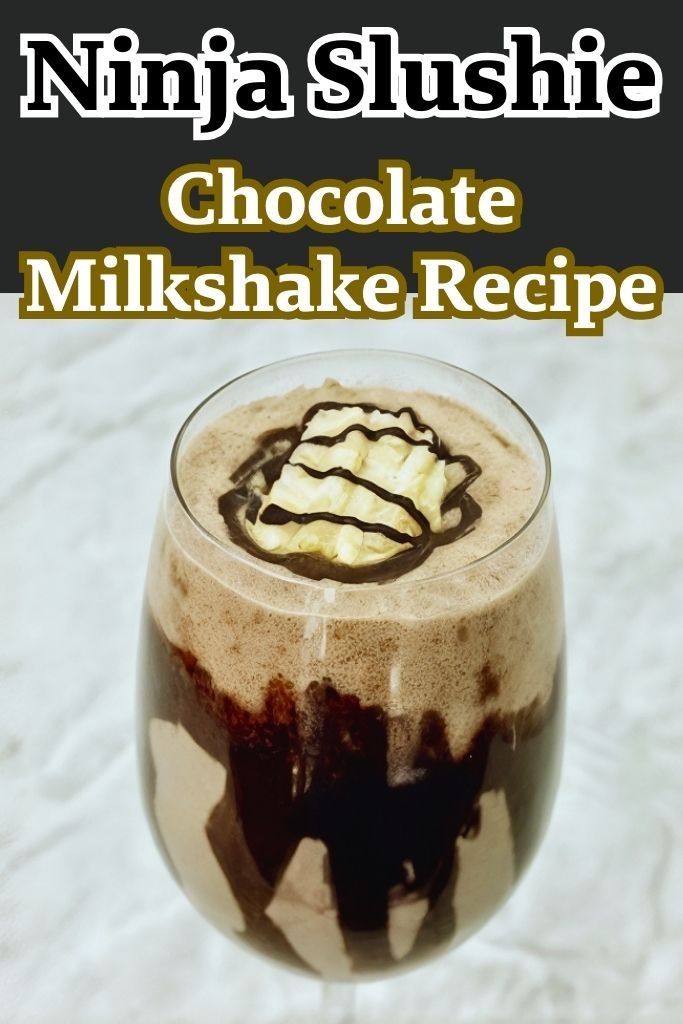
Ninja Slushie Chocolate Milkshake Recipe
The Ninja Slushie Chocolate Milkshake Recipe is the perfect treat for any chocolate lover.
The Ninja Creami machine has been such a fun kitchen appliance to experiment with! Milkshakes are fun because you have many choices to make a milkshake and vary the flavors.
You get total control of your ingredients and can make a wide array of favorite desserts. You can even choose your favorite consistency by blending until it’s just right.
Just blend, pour, garnish if desired, and enjoy with loved ones!
This chocolate milkshake is perfect for hot summer days, after-school snacks, or weekend family time.
A Ninja Slushie Chocolate Milkshake Recipe combines rich chocolate flavors with creamy milk to create the ultimate frozen treat.
I prefer this Ninja Slushie Chocolate Milkshake over other milkshakes because it comes out perfectly smooth every time, and the Ninja machine makes it so easy to get that thick, creamy texture we all love.
Today I’m sharing my go-to Ninja Slushie Chocolate Milkshake Recipe that never fails to make everyone smile.
What is the secret of a good milkshake?
A good milkshake is all about balance. You want the right mix of milk, cream, and flavor. Too much milk makes it watery, and too much ice can take away the creaminess.
The key is using cold, rich ingredients so the texture stays thick and smooth. I also think a little vanilla extract makes the chocolate taste better because it adds depth.
Another secret is blending until everything is fully mixed but not overdoing it. You want it creamy, not foamy.
Why You’ll LOVE This Drink
You’ll love this Drink because it tastes just like the ones from your favorite ice cream shop, but you make it at home with ease.
You save money and know exactly what’s in it – no hidden stuff. Your kitchen stays clean since the Ninja does most of the work.
You can change the milk or the toppings to match what you like. This recipe works with a Ninja Slushie machine or similar frozen drink tool, so the texture comes out just right.
Ninja Slushie Chocolate Milkshake Recipe Ingredients
- 2 cups whole milk: Whole milk gives the milkshake a creamy base. This is the main liquid that makes everything smooth. If you want it lighter, you can use 2% or even almond milk, but the texture won’t be as rich. Oat milk also works as a dairy-free option.
- 1 cup heavy cream: This makes the shake thick and smooth. Heavy cream is what creates that restaurant-quality texture. You can swap with half-and-half if that’s what you have, but it won’t be as thick. For a lighter version, use less cream and more milk.
- 1 teaspoon vanilla extract: Vanilla balances the chocolate flavor and makes everything taste better. No vanilla? A drop of almond extract works too. Make sure to use pure vanilla extract, not imitation vanilla.
- 2 tablespoons granulated sugar: Sugar sweetens the shake and helps balance the cocoa’s natural bitterness. You can replace it with honey, maple syrup, or a sugar substitute like Stevia. Brown sugar also works and adds a slightly different flavor.
- ¼ cup chocolate syrup: This is where the main chocolate flavor comes from. Hershey’s works great, but any brand of chocolate syrup will do. You can also use homemade chocolate syrup if you have it.
- 2 tablespoons cocoa powder: Cocoa adds a rich, deep chocolate taste that syrup alone can’t provide. You can skip it if you want a lighter shake, but I like the extra flavor. Use unsweetened cocoa powder for best results.
- Optional toppings: Whipped cream, chocolate drizzle, sprinkles, or crushed cookies make it look fancy and taste even better.
Recommended Equipment
- Ninja Slushie Professional Frozen Drink Maker – Creates perfect slushy texture
- Measuring cups and spoons – Get ingredient amounts right
- Whisk or mixing bowl – Mix ingredients before blending
- Spatula – Scrape every drop from bowl
- Tall glasses – Serve your milkshake
How To Make Ninja Slushie Chocolate Milkshake
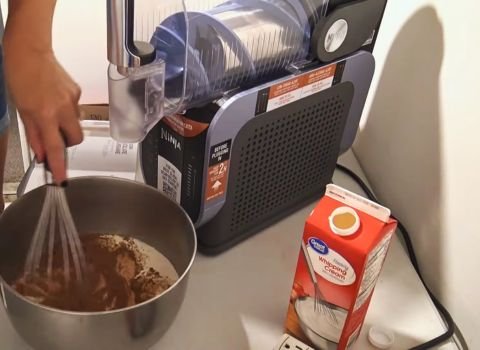
Step 1 | Mix the base
In a large bowl, whisk together milk, cream, vanilla, sugar, chocolate syrup, and cocoa powder. Stir everything really well until the sugar dissolves completely and the mixture looks smooth. This takes about 2-3 minutes of good stirring. Make sure there are no lumps of cocoa powder left. The mixture should be a nice chocolate brown color.
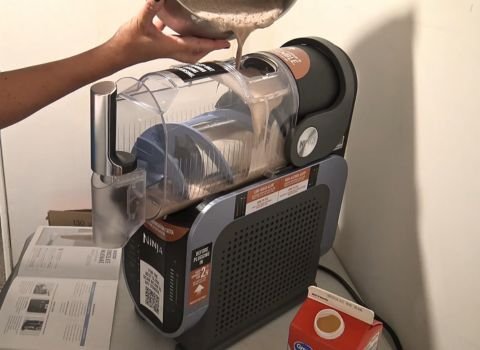
Step 2 | Pour into the Ninja slushie machine
Carefully pour the mix into your Ninja slushie vessel. Go slow so you don’t spill – it gets messy quick. Fill it to the max line, but don’t go over. If you have extra mixture, save it for a second batch. Wipe off any spills from the outside of the container.
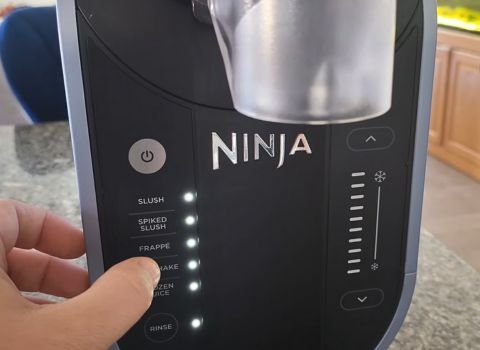
Step 3 | Set the machine
Plug in the Ninja and make sure it’s properly connected. Press the Milkshake preset button and let it do its job. My machine usually takes about 15 minutes to get the perfect consistency. Don’t open the lid during this time – let it work properly.
Step 4 | Wait for the beep
When the machine beeps, it means the shake has reached the perfect consistency. The mixture should be thick and smooth, not icy or chunky. If it seems too thin, run it for another minute or two.
Step 5 | Serve
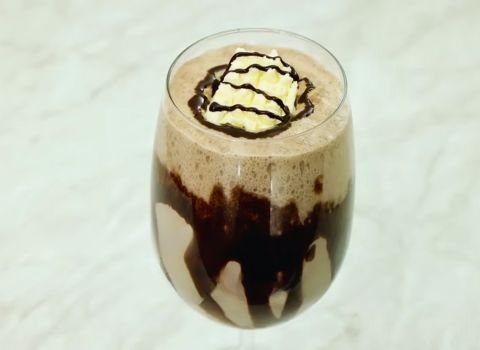
Pour the milkshake into tall glasses right away. Top with whipped cream and drizzle extra chocolate syrup for that classic milkshake look. Add a straw and serve immediately. The shake tastes best when it’s fresh and cold.
Helpful Tips for a Perfect Ninja Slushie Chocolate Milkshake
- Use cold ingredients straight from the fridge for the thickest milkshake.
- Taste your mixture before pouring it into the Ninja and adjust sweetness if needed.
- Clean your Ninja vessel right after use so chocolate doesn’t stick and harden.
- If your shake is too thick, add a splash of milk and blend again.
- If it’s too thin, use a little more heavy cream the next time.
What to Serve with this Chocolate Milkshake
A chocolate milkshake goes well with lots of simple snacks. I like pairing mine with fries or a burger – it gives that classic diner feel.
You can also enjoy it with cookies, brownies, or even a slice of cake for a full dessert experience.
When I serve the Ninja Slushie Chocolate Milkshake, I pick tall glasses and add nice garnishes. A dollop of whipped cream and a chocolate drizzle make it look special.
I place a straw and a long spoon so people can sip or scoop. For kids, I sometimes add sprinkles or a cookie on the rim.
How To Store Leftover
If you have leftover milkshake, you can keep it in the freezer. Pour it into an airtight container and freeze for up to 2 days.
When you want to drink it again, let it sit at room temperature for 10–15 minutes and then blend it quickly to bring back the smooth texture.
If it looks icy or separated, that means it’s no longer fresh. At that point, it’s best not to drink it. This recipe is always best enjoyed fresh, but freezing works in a pinch.
Ninja Slushie Chocolate Milkshake Recipe FAQs
1. How do I make a chocolate milkshake without a blender?
You can make one by whisking or shaking the ingredients in a jar. Add milk, cream, chocolate syrup, cocoa, and sugar into a mason jar. Close the lid tight and shake hard for 3–4 minutes until smooth. It won’t be as thick as the Ninja version, but it works fine.
2. Is it okay to make the base ahead of time?
You can mix the liquid base a few hours before you want to make the shake. Keep it covered in your refrigerator until you are ready to pour it into the Ninja machine. This can save you time later.
3. Can I add other flavors?
Sure, add peanut butter for nutty twist or strawberries for fruity. Mix in after base or during blend. I tried mint extract for chocolate mint—yum. Keep amounts small to not thin it.
4. Why does my shake separate?
Separation happens if not mixed well or sat too long. Stir before churning. Use cold items to bind better. Emulsifiers like vanilla help. If it separates after, stir again. I avoid by serving fresh. Warm room speeds it up, so keep cool. Proper ratios prevent this mostly.
Ninja Slushie Chocolate Milkshake Recipe

Learn how to make a creamy chocolate slushie milkshake using your Ninja Slushi. Simple ingredients, quick prep time, and restaurant-quality results every time.
Ingredients
- 2 cups whole milk
- 1 cup heavy cream
- 1 teaspoon vanilla extract
- 2 tablespoons granulated sugar
- ¼ cup chocolate syrup
- 2 tablespoons cocoa powder
- Optional toppings: whipped cream, chocolate drizzle, sprinkles, crushed cookies
Instructions
- In a large bowl, whisk together milk, cream, vanilla, sugar, chocolate syrup, and cocoa powder. Stir everything really well until the sugar dissolves completely and the mixture looks smooth. This takes about 2-3 minutes of good stirring. Make sure there are no lumps of cocoa powder left. The mixture should be a nice chocolate brown color.
- Carefully pour the mix into your Ninja slushie vessel. Go slow so you don't spill - it gets messy quick. Fill it to the max line, but don't go over. If you have extra mixture, save it for a second batch. Wipe off any spills from the outside of the container.
- Plug in the Ninja and make sure it's properly connected. Press the Milkshake preset button and let it do its job. My machine usually takes about 15 minutes to get the perfect consistency. Don't open the lid during this time - let it work properly.
- When the machine beeps, it means the shake has reached the perfect consistency. The mixture should be thick and smooth, not icy or chunky. If it seems too thin, run it for another minute or two.
- Pour the milkshake into tall glasses right away. Top with whipped cream and drizzle extra chocolate syrup for that classic milkshake look. Add a straw and serve immediately. The shake tastes best when it's fresh and cold.
Nutrition Information:
Serving Size: about 1 cup eachAmount Per Serving: Calories: 356Total Fat: 23gCholesterol: 82mgCarbohydrates: 30gFiber: 2gSugar: 26g
I hope you try this Ninja Slushie Chocolate Milkshake Recipe soon. It’s easy, fun, and tastes so good. Mix it up at home and enjoy the creamy chocolate.
Share with others for smiles all around. You’ll love making it your way!